Editing Documents
Drawing Lines and Curves
Drawing
To draw a straight line, activate the Line tool ![]() in the toolbar. Place the cursor and press the left mouse button to specify the beginning of the line. Holding down the button, point to the location for the end of the line and release the button.
in the toolbar. Place the cursor and press the left mouse button to specify the beginning of the line. Holding down the button, point to the location for the end of the line and release the button.
To draw a polygonal chain (path), activate the Spline tool ![]() . Click on the canvas to place the first point. Click the second time to place another point and so on. These points specify the ends for the segments. The points you add are called anchor points. If you simply click and release, the resulting line is straight. However, if you click to add a second point, hold the button, and drag the cursor, you can curve your line.
. Click on the canvas to place the first point. Click the second time to place another point and so on. These points specify the ends for the segments. The points you add are called anchor points. If you simply click and release, the resulting line is straight. However, if you click to add a second point, hold the button, and drag the cursor, you can curve your line.
The Line and Spline tools share the same button in the toolbar. If the tool you need is hidden, click on the arrow and select the tool in the drop-down menu.
To create a closed shape, place the last anchor point over the first one (a small circle near the cursor indicates that you can close the shape).
To draw straight lines at angles divisible by 45 degrees, add lines while holding down the Shift key.
Anchor Points and Paths
A path comprises anchor points and lines that connect them. Anchor points mark the beginning and end of each line (or segment). By adding one line after another, you create a path.
The path can be either closed or open. A closed path begins and ends at the same point.
Anchor points can be of two types: corner point and smooth point. To change the type of an anchor point, double-click on it. When you do this, the adjoining lines change from curved to straight and vice versa.

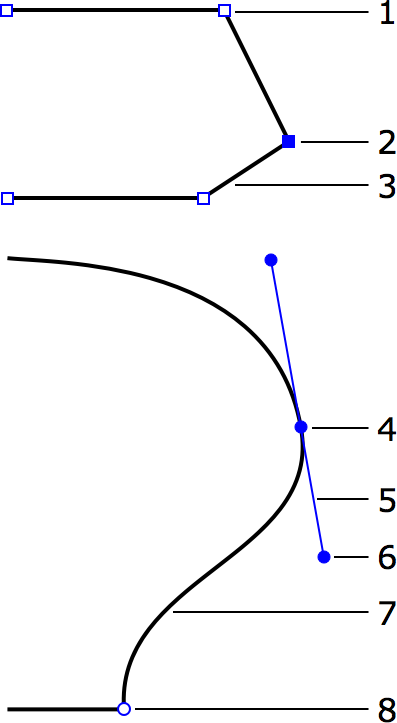
1 – Corner point. At a corner point, a path abruptly changes its direction. A corner point may join either straight or curved lines in any combination. A corner point with two straight lines doesn't have handles that change the curve.
2 – Selected anchor point (highlighted with blue color).
3 – Straight segment.
4 – Smooth point. At a smooth point, the path continues to follow the same direction. A smooth point joins two curved segments.
5 – Direction line.
6 – Direction point. It is a handle at the end of a direction line. Moving a direction point, you can change the length and angle of the corresponding direction line.
7 – Curved segment.
8 – Corner point.
To select an anchor point, click on it with the selection tool. Hold down Shift and click to select several anchor points.
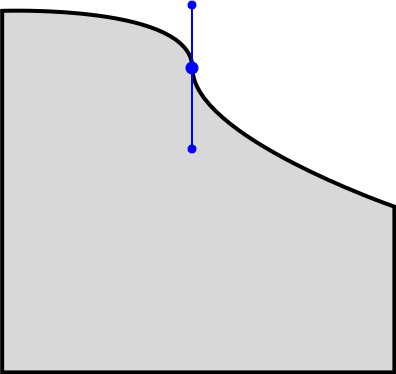
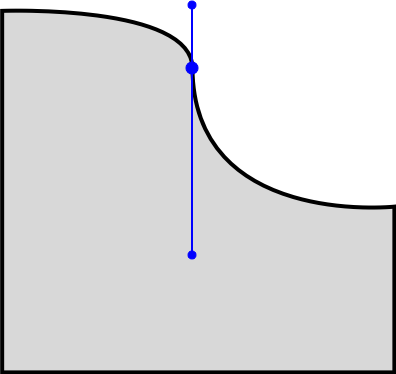
The direction of a curved path through a smooth anchor point coincides with the direction of the direction line. Leaving the anchor point, the path branches off from the direction line. The longer the direction line is, the longer the path passes along it. To change the angle or length of the direction line, drag the direction point on its end.


By default, the direction lines of the same smooth point rotate together, preserving a 180 degree angle between them. By changing this angle you can create a corner point from a smooth point. To do this, drag one of two direction points while holding down the Cmd key. To make the two direction lines rotate together again, restore a 180 degree angle between them. Or, double-click on the anchor point two times.
If you need to rotate one of direction lines separately from another, do this while holding down the Cmd key.
To rotate a direction line in 45 degrees increments, press and hold the Shift key.
Adding and Deleting Anchor Points
Once you have finished drawing the path, you can add or remove anchor points.
To add a new point, activate the Selection tool, select the path, and click on a segment holding down Opt-Shift.
To delete an anchor point, select it and press the Delete key. Deleting an anchor point in the middle of a path connects the two neighboring anchor points with a new segment.
Adding Another Path
Once you have finished drawing a path, you can add another path to the same object. The result is still a single object.
- Select the existing path using the Selection tool.
- Activate the Spline tool.
- Press and hold the Alt key, and draw.